Directed Study - Session 3
Technically, I missed session 3 of my summer directed study due to illness, but I still have a bit of work to show for that time period:

These are all of the individual adaptive skin topology pieces that I crafted in ZBrush this past weekend. Well, actually, I should amend that: these are the adaptive skin pieces along with the other two base meshes that are staying just as they are aside from sculpting. Most of this form is meant to look as if it were constructed out of sheet metal, but the hand and the base are cast metal, and therefore have no need of new adaptive skin geometry.
I tried to build these pieces as if they were cut and folded out of flat pieces of sheet metal. There are no solid tubes: all round forms have a break where the two sides meet, as if a piece of sheet metal were wrapped around to form a cylinder. All of the pieces should be able to lie flat if they were unfolded, which should make for easy UVing. My next step was to create some overlap on certain edges.
Directed Study - Session 4
For those who prefer still views, I have those as well:
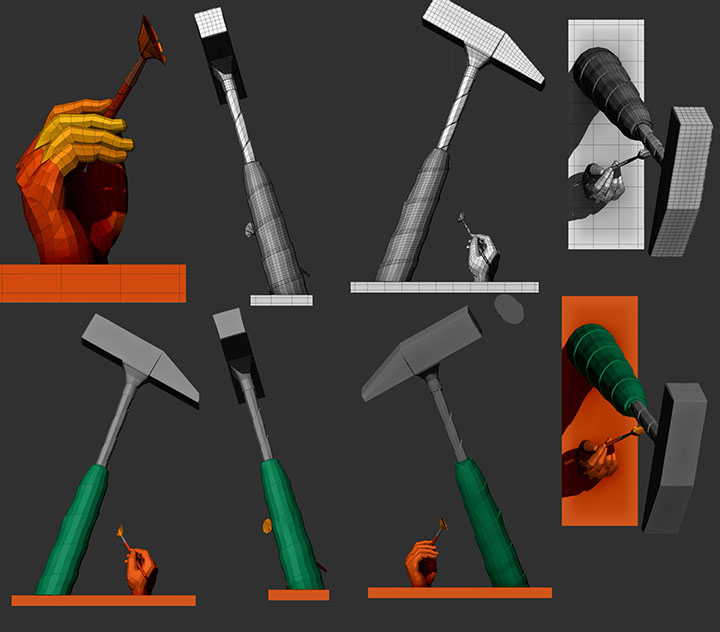
These are the ZBrush adaptive skin pieces transformed in Maya (then taken back into ZBrush for quick and easy turntable rendering). I pushed and pulled on edges to create overlapping geometry around the pieces that spiral up the handle and neck of the hammer. I closed off gaps where the ends of the folded "metal" meet. I enlarged the top piece of the hammer head so that its geometry was overlapping, rather than interpenetrating, the bottom portion of the hammer head. Finally, I added edge loops to just about everything. I added holding edges where I require crisp bends in the mesh and then added more loops throughout the geometry to make the pieces of the mesh more square so that when I begin sculpting in ZBrush it will work with my topology rather than fighting it.
After all of that I spent a bit of time adding the ridge that I'd forgotten to construct with the rest of the Gecko months ago:

You may notice that, unlike my last turntable of him, this Gecko has no color. I wish that was the only thing that he was missing. Unfortunately, some of my work seems to have disappeared. Apparently it never got saved, though I don't know how: I'm usually very meticulous about that kind of thing. My best guess as to a motive for my carelessness is that I was too busy rendering out turntables. I must have thought that I had saved before doing so, but didn't. That's all I can figure, because I've done a file search of both my computer and my portable drive and the gecko above, minus the ridge, is the latest version of him that I can find.
Thankfully, not all of the work that I did before rendering last week's turntable was lost, however. The part of him that I had the most difficulty with was bringing the two halves of his tail together and getting the top one to fold around the edges of the bottom one: that work is still intact. It's everything else that I lost. I had spent a bit of time moving the edges of his geometry around so that none of the panels in his main body or head were penetrating one another any longer - everything was overlapping as it should - and that's the work that I lost. It's a shame too, because I had had difficulty determining what pieces should overlap where on his face the last time that I tried to perform that task when I built the Gecko a few months back, and this time it came so easily... I'm afraid that if I attempt it again that I may find that what came so easily this past weekend was a fluke and I'll start having trouble with it again.
But, anyway, back to this week. I built the ridge by altering the geometry of my original gecko base mesh to give it a ridge on its back: I just used a soft-select on the edge in the center of his spine and raised the whole central line of his back up a bit. Then I exported that mesh as an OBJ, brought it into ZBrush, and used the retopology tools to create adaptive skin ridge pieces. I moved the topology markers by hand for every new piece of the ridge rather than making one and duplicating it: I wanted the pieces to have a bit of variance in shape and size, and I thought it might help to maintain the flow of the ridge better than duplicating pieces and trying to place them by hand.
I think it turned out pretty well. ZBrush gave me a bit of trouble with it: whenever I moved the topology and tried to create a new piece I had to hit "preview" a number of times because it wouldn't register that I'd created a new piece of topology until I had. I didn't realize that I had made the same adaptive skin three times until I thought that I had made three separate pieces and then tried to append them to my model to get a look at them. I appended all three, but only one showed up. It was only after fiddling with the visibility of the layers a bit that I realized that I did have three separate pieces, they were just three of the exact same separate piece. That's when I started paying better attention to what ZBrush was doing. I began noticing that when I hit preview it showed the previous adaptive skin, rather than the current one that I was working on. When I went back to the mesh and then hit preview again, that's when it updated. Hence, it was a slower process than I would have liked to create the ridge, but nevertheless I got it done.
Now my task is UVing. I wasn't really planning to UV the Gecko unless I had extra time at the end, but it occurs to me that my one of my final renders of him will not be in ZBrush. It will be in another program (likely Modo) that wont be able to handle one of ZBrush's multi-million poly meshes. That means a normal map, which, in turn, means UVs. Ugh. But, I'd rather get them out of the way now than to have to go through the process of reprojecting detail on all of the levels of a newly UVed mesh later while I'm trying to wrap everything else up. So, on to UVing I go! Please wish me luck and lots of speed! ;)